Documentation
PVE Documentation
A focused map for configuring and understanding PVE-related monitoring.
Overview
PVE monitoring is the core of Proxmox Extended Sensors and provides Home Assistant with visibility into the Proxmox VE hosts and workloads that you choose to monitor.
The integration organizes this information into Home Assistant devices and entities so that node health, resource usage, virtual machines, containers, storage and supported hardware information can be used in dashboards, notifications and automations.
What PVE monitoring covers
A configured PVE connection can provide information from several areas of a Proxmox VE environment:
- Node monitoring — status, CPU, memory, swap, load, I/O wait, network activity and other node-level information.
- Virtual machines and containers — status and resource information for the guests selected for monitoring.
- Storage — capacity, usage and status information for storage resources available through PVE.
- Hardware monitoring — supported temperature, NVMe, SMART and memory information when the required data is available on the Proxmox host.
The exact entities available depend on the host, its hardware, the selected monitoring options and the information exposed by Proxmox.
Designed for standalone and clustered environments
PVE monitoring can be used with a standalone Proxmox VE host or with nodes that belong to a cluster.
In a standalone installation, the PVE connection provides the main view of the server and its workloads.
In a clustered environment, PVE continues to provide detailed node-level information while the Cluster part of Proxmox Extended Sensors can provide the broader cluster-wide view.
This separation allows detailed monitoring to remain associated with the relevant PVE resources without losing the overall view of the environment.
Home Assistant organization
Proxmox Extended Sensors represents the monitored Proxmox environment using Home Assistant devices and entities.
This keeps related information grouped together and makes it easier to identify whether an entity belongs to a node, virtual machine, container, storage resource or supported hardware component.
You do not need to use every entity that the integration exposes. The goal is to make the Proxmox information that matters to your environment available wherever Home Assistant can make useful use of it.
Where to continue
If this is your first PVE connection, continue with Authentication to prepare access in Proxmox VE and then Configuration to add the server to Proxmox Extended Sensors.
The remaining sections cover the information exposed after setup:
↑ Back to topConfiguration
Once authentication has been prepared in Proxmox VE, the PVE connection can be added to Proxmox Extended Sensors from Home Assistant.
The configuration flow guides you through the connection details and the monitoring options available for the server.
Add the integration
In Home Assistant, open:
Settings → Devices & services → Add Integration
Search for Proxmox Extended Sensors and start the configuration flow.
Select Proxmox VE (PVE) when choosing the type of server you want to configure.
Connect to the PVE server
Enter the connection information for your Proxmox VE host.
The configuration flow will request the server address and the authentication information prepared in the previous section.
When API Token authentication is used, enter the Proxmox user, Token ID and Token Secret as separate values.
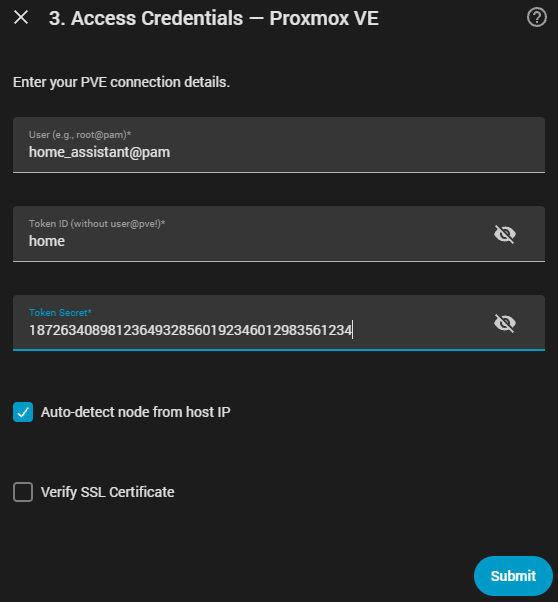
The integration can automatically detect the Proxmox node associated with the host address. Advanced configurations can disable automatic detection when the node needs to be specified manually.
SSL verification
Proxmox Extended Sensors can verify the SSL certificate presented by the PVE server.
Enable certificate verification when the server uses a certificate that Home Assistant can validate correctly.
Environments using the default Proxmox self-signed certificate may require SSL verification to remain disabled unless the appropriate certificate trust has been configured.
Disabling verification should only be used for environments where you understand and trust the connection path.
Choose what to monitor
After the connection has been validated, the configuration flow allows you to select the resources that should be exposed to Home Assistant.
You do not need to monitor every available resource.
Choose the nodes, virtual machines, containers, storage or supported monitoring options that are useful for your Home Assistant environment.
A focused selection keeps the resulting devices and entities easier to understand and reduces unnecessary monitoring.
The selection can be adjusted later if your environment or monitoring requirements change.
Configuration can evolve
The initial setup does not need to represent the final monitoring configuration.
A practical approach is to start with the resources that matter most, confirm that the resulting devices and entities provide useful information, and then expand the configuration when a real need appears.
This is especially useful in larger Proxmox environments where exposing every possible resource would create a large number of Home Assistant entities.
After configuration
Once setup is complete, Home Assistant creates the corresponding devices and entities for the selected PVE resources.
The following sections explain how that information is organized and what the different monitoring areas provide:
If the connection succeeds but expected information is missing, see Troubleshooting.
↑ Back to topAuthentication
Proxmox Extended Sensors needs an account with permission to read the Proxmox VE information and perform the actions you choose to expose to Home Assistant.
For PVE, V5 supports:
- API Token authentication — recommended
- Username and password
Using a dedicated Home Assistant account is recommended instead of connecting the integration with the Proxmox root account.
Create a dedicated user
In Proxmox VE, open:
Datacenter → Permissions → Users
Create a dedicated account for Home Assistant. For example:
homeassistant@pve
Using a separate account keeps the integration access independent from your administrative login and makes its permissions easier to identify and manage.
Assign permissions
The permissions required depend on what you want Proxmox Extended Sensors to do.
Monitoring-only access can be more restrictive, while features such as VM and CT control, backup operations and access to additional Proxmox information may require additional privileges.
For a full-feature installation, the project documentation has traditionally used the PVEAdmin role at / for the dedicated Home Assistant user.
PVEAdmin is a broad role. Advanced users can create a more restrictive permission model, but all integration features they intend to use should then be tested.
Insufficient permissions may allow the initial connection while preventing access to optional Proxmox endpoints or features.
Create an API Token
For the recommended token-based authentication, open:
Datacenter → Permissions → API Tokens
Select the dedicated Home Assistant user and create a token. For example:
ha-token
Proxmox will generate the token secret when the token is created.
Save the secret immediately. Treat it as a credential and never include it in screenshots, logs, issues or other public material.
Privilege Separation
Pay attention to the Privilege Separation option when creating the token.
If privilege separation is enabled, the API token can require explicit permissions in addition to those assigned to its parent user.
A token may therefore authenticate successfully while some integration features still fail because the token itself does not have the required privileges.
If the token is intended to inherit the permissions of the dedicated Home Assistant user, configure Privilege Separation accordingly in Proxmox.
Credentials used in Home Assistant
When API Token authentication is selected, Proxmox Extended Sensors expects three separate values:
- User — the complete Proxmox user including its realm, for example
homeassistant@pve - Token ID — only the token name, for example
ha-token - Token Secret — the secret generated by Proxmox
Do not enter the complete combined Proxmox API-token string into the Token ID field.
Once authentication is prepared, continue with Configuration to add the PVE server to Proxmox Extended Sensors.
↑ Back to topNode monitoring
Node monitoring provides a continuous view of the state and resource usage of your Proxmox VE host.
Proxmox Extended Sensors exposes the most useful node-level information as Home Assistant entities, allowing the server to be included in dashboards, notifications and automations without replacing the detailed administration tools available in Proxmox VE.
Node status
The node status provides a simple indication of whether the Proxmox VE host is available to the integration.
This can be useful as a high-level health indicator and as a condition for Home Assistant automations that depend on the availability of the server.
A node becoming unavailable does not necessarily mean that the server itself has failed. Network connectivity, authentication or communication with the Proxmox API can also affect the information available to Home Assistant.
CPU and system load
CPU usage shows how much processor capacity is currently being used by the node.
System load provides additional context by representing the amount of work waiting for or using system resources.
These values are useful together: CPU usage provides an immediate view of processor activity, while load can help identify sustained pressure that may not be obvious from a single CPU percentage.
Memory and swap
Memory monitoring provides visibility into the RAM used by the Proxmox host and its workloads.
Swap information can provide additional context when investigating memory pressure.
Occasional swap usage does not by itself indicate a problem, but changes in memory and swap behaviour can be useful when diagnosing resource constraints or comparing normal operation with periods of unusually high activity.
I/O wait
I/O wait represents time during which the system is waiting for storage operations to complete.
It can be particularly useful when investigating a node that feels slow even though CPU usage does not appear unusually high.
Sustained or abnormal I/O wait may justify checking the underlying storage workload and hardware in more detail.
Network activity
Network monitoring provides receive and transmit activity for the node.
This information can help identify periods of high network usage and provide context for operations such as backups, migrations, media transfers or other workloads that generate significant traffic.
As with other resource metrics, the value is often most useful when compared with the normal behaviour of your own environment.
Resource information works best together
Individual metrics rarely tell the complete story.
For example, high CPU usage may be expected during a demanding workload, while increased network and storage activity may be normal during a backup operation.
Combining CPU, load, memory, swap, I/O wait and network information provides a much more useful picture of what the node is doing.
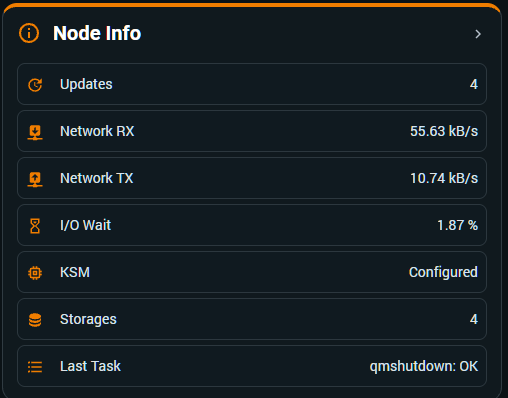
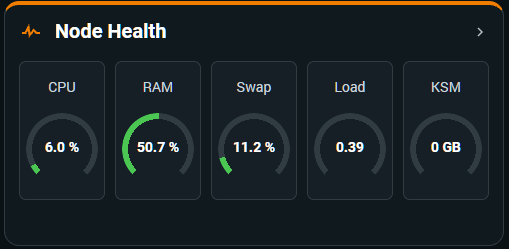
Home Assistant can display these values together on a dashboard or use selected conditions to notify you when behaviour moves outside the range you consider normal.
Monitor trends, not every fluctuation
Node metrics can change constantly.
Not every short CPU spike, increase in network traffic or temporary change in memory usage requires attention.
When creating dashboards and automations, focus on sustained conditions and information that helps identify meaningful changes in the behaviour of the node.
For the complete list of node entities exposed by the integration, see Reference.
↑ Back to topVM & CT monitoring
Proxmox Extended Sensors can monitor selected virtual machines and LXC containers alongside the PVE nodes that host them.
Instead of exposing every guest automatically, the integration lets you choose which VMs and containers are useful in Home Assistant.
This keeps guest monitoring focused while still providing the information needed for dashboards, notifications and automations.
Select the guests that matter
A Proxmox environment can contain many virtual machines and containers, but Home Assistant does not necessarily need information from all of them.
Select the guests whose state or resource usage has a useful purpose in Home Assistant.
Typical examples include:
- infrastructure services you want to know are running;
- important application servers;
- containers involved in Home Assistant automations;
- workloads whose CPU or memory usage you want to observe;
- guests whose state you want to include on a dashboard.
The guest selection can be adjusted later as your environment changes.
Guest status
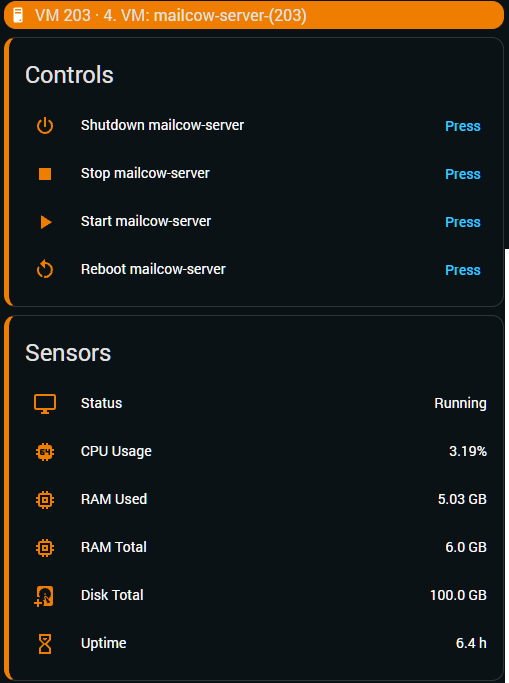
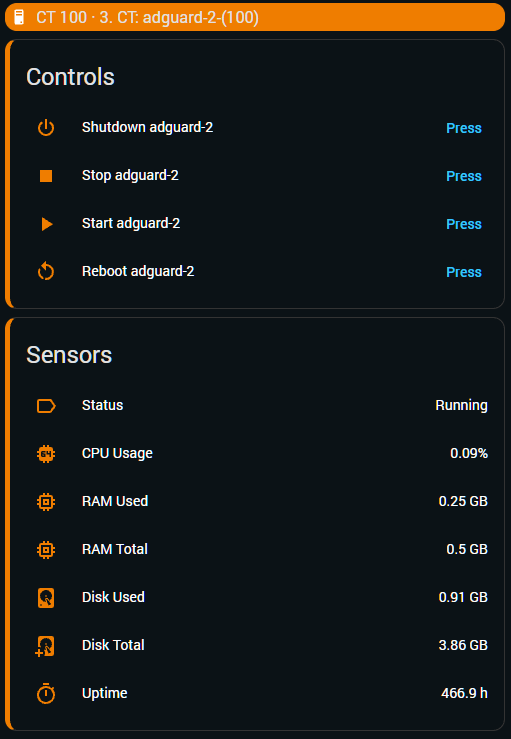
Guest status provides a quick view of whether a selected VM or container is running, stopped or in another state reported by Proxmox.
This is often one of the most useful pieces of guest information because it can be displayed directly on a dashboard or used by Home Assistant as part of an automation.
For example, the state of an important service VM or container can be monitored without continuously opening the Proxmox interface.
Resource monitoring
Selected guests can expose resource information such as CPU and memory usage together with other information available for that guest.
These metrics provide context about what a workload is doing and can help identify unusual behaviour or sustained resource pressure.
As with node monitoring, short-lived changes are not necessarily problems. Resource information is most useful when interpreted in relation to the normal behaviour and purpose of the guest.
Guest controls
When the configuration and Proxmox permissions allow it, Proxmox Extended Sensors can also expose supported guest control actions in Home Assistant.
These can include actions such as:
- Start
- Stop
- Shutdown
- Reboot
Monitoring access and control access are not necessarily equivalent. An account may have sufficient permissions to read guest information while lacking the privileges required to perform control operations.
Use guest controls deliberately and grant only the permissions required for the functionality you intend to use.
VMs and containers remain distinct
Virtual machines and LXC containers are different Proxmox workload types and remain represented separately by the integration.
This makes it easier to identify and organize them in Home Assistant while still providing a consistent monitoring experience.
The exact information available can differ between VMs and containers depending on what Proxmox exposes for each workload type.
Guest identity in a cluster
In a clustered Proxmox environment, a virtual machine or container may move from one node to another.
Proxmox Extended Sensors V5 is designed so that a monitored guest remains the same Home Assistant resource when it migrates between nodes in the same configured cluster.
The node currently hosting the workload can change without turning the migrated guest into a new Home Assistant entity.
This is important for long-term monitoring because dashboards, automations, history and other Home Assistant configuration associated with the guest can remain attached to the same logical resource after migration.
In everyday use, the guest can therefore be treated as the workload it represents rather than as something permanently tied to a particular PVE node.
Monitoring after migration
A migration can temporarily change where the integration obtains information about a guest, but the monitoring model is designed to follow the workload to its current node.
This means that cluster operations do not require you to rebuild your Home Assistant setup simply because a VM or container has moved.
For cluster-wide information such as quorum, overall resources, HA or the state of multiple nodes, use the dedicated Cluster monitoring section.
Use guest information where it adds value
Guest monitoring is most effective when the information has a purpose.
A dashboard may only need the state and basic resource usage of important workloads, while an automation may only care whether a particular guest has unexpectedly stopped.
There is no benefit in giving every VM and container the same amount of attention simply because the information is available.
For the complete list of VM and CT entities exposed by the integration, see Reference.
↑ Back to topHardware
Proxmox Extended Sensors can complement the information provided by the Proxmox API with hardware monitoring from the PVE host.
When supported by the system, this provides additional visibility into temperatures, storage devices and installed memory directly from Home Assistant.
Hardware monitoring is optional and the information available depends on the physical server, its sensors, installed drives and the data that the host can expose.
Temperature monitoring
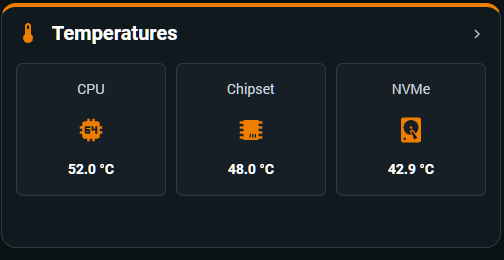
Supported systems can expose temperature information detected on the PVE host.
Depending on the hardware, this may include:
- CPU temperature;
- individual CPU core temperatures;
- chipset or motherboard-related temperatures;
- NVMe drive temperatures;
- other supported temperature sensors detected by the host.
The exact names and number of sensors can vary significantly between systems.
A compact mini PC, a workstation and a rack server may expose completely different hardware information even when all three run the same version of Proxmox VE.
lm-sensors
Linux hardware sensors detected through lm-sensors can provide additional temperature information to the integration.
Proxmox Extended Sensors does not create hardware measurements that the operating system cannot detect. If a temperature or hardware sensor is not available on the PVE host, the integration cannot expose it to Home Assistant.
This makes the host itself the first place to check when an expected hardware sensor is missing.
SMART and storage health
Supported physical drives can expose SMART-related information that helps provide visibility into the underlying storage hardware.
This information complements the storage capacity and usage data provided elsewhere by the integration.
Storage monitoring answers questions such as how much space is being used, while hardware monitoring can provide information about the physical device behind that storage.
The exact SMART information available depends on the drive, controller and how the storage device is exposed to the operating system.
NVMe devices
NVMe drives can provide device-specific information such as temperature and supported health data.
As with SMART monitoring, availability depends on whether the PVE host can access the required information from the device.
Controllers, passthrough configurations and other storage arrangements can affect what the host — and therefore the integration — can see.
Memory information
When the required system information is available, Proxmox Extended Sensors can expose information about installed memory modules.
This can include the capacity of individual DIMM slots and other supported memory information detected on the host.
DIMM monitoring is useful for documenting the physical memory configuration of a node and can complement the overall RAM usage information available through Node monitoring.
Hardware availability varies by host
Two PVE nodes configured identically in Home Assistant may expose different hardware entities.
This is expected.
Hardware monitoring depends on factors such as:
- motherboard and CPU sensor support;
- kernel and driver support;
- installed storage devices;
- storage controllers;
- available SMART or NVMe information;
- memory configuration;
- what the underlying operating system can detect.
For this reason, the absence of a particular hardware entity does not automatically indicate a problem with Proxmox Extended Sensors.
Use hardware data as additional context
Hardware information is most useful when combined with the operational information from the rest of the integration.
For example, increased I/O activity together with an unusual storage temperature provides more context than either value alone.
Likewise, CPU usage and CPU temperature describe different aspects of the same workload.
Use the hardware entities that provide meaningful information for your equipment rather than expecting every possible sensor to be present.
For the complete list of supported hardware entities, see Reference.
If hardware information that should be available on the host does not appear in Home Assistant, see Troubleshooting.
↑ Back to topStorage
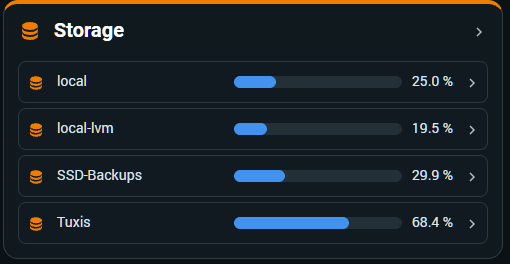
Proxmox Extended Sensors can expose information about the storage resources configured and available through Proxmox VE.
This provides Home Assistant with visibility into storage capacity, usage and availability without requiring the physical device behind the storage to be monitored directly.
Proxmox storage
A PVE storage represents a storage resource configured in Proxmox VE.
Depending on the environment, this can include local storage as well as shared or remote storage used by the node.
The integration monitors the information that Proxmox exposes for these storage resources and represents it in Home Assistant.
This means that Storage monitoring focuses on the resource as PVE sees it rather than on the physical disk that may exist underneath it.
Capacity and usage
Storage information can provide visibility into values such as total capacity, used space and available space.
These metrics are useful for dashboards and for identifying storage resources that are approaching the limits you consider appropriate for your environment.
Home Assistant can also use storage information in notifications or automations when a capacity threshold requires attention.
A storage reaching a high percentage of usage does not always require immediate action, but monitoring the trend can help prevent unexpected capacity problems.
Local and remote storage
Not every PVE storage is a local physical disk.
A Proxmox environment may use storage backed by different technologies or remote systems.
From the integration’s point of view, the important distinction is that PVE exposes the resource as storage that can be monitored.
This allows Home Assistant to provide a consistent view of storage usage even when the underlying storage technologies are different.
Storage and hardware are different views
Storage monitoring and Hardware monitoring provide complementary information.
Storage describes the resource available to Proxmox:
- how much capacity it has;
- how much is being used;
- how much remains available;
- and its reported availability or state.
Hardware can provide information about the physical device itself when that information is available:
- temperature;
- SMART information;
- NVMe health data;
- and other supported hardware characteristics.
A storage resource can therefore be monitored even when Home Assistant has no direct hardware information about the device behind it.
Likewise, a physical disk detected by the hardware monitoring system does not necessarily correspond one-to-one with a PVE storage.
Mounted disks
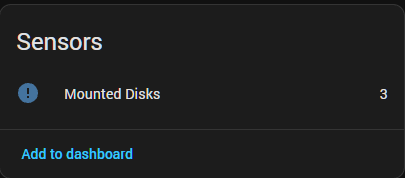
Proxmox Extended Sensors can also expose supported mounted disk information when it is available from the PVE host.
Mounted disks are useful when storage attached to the server needs visibility in Home Assistant even when it does not map directly to the same concepts used by Proxmox storage definitions.
This provides an additional view of storage resources without treating mounted filesystems as physical disk health sensors.
Use storage information proactively
Storage monitoring is most useful before capacity becomes a problem.
Rather than checking storage only after an operation fails, Home Assistant can keep important capacity information visible or notify you when usage reaches a threshold appropriate for that resource.
Different storage resources may need different thresholds.
A small system volume, a large media store and a backup destination do not necessarily require the same amount of free space or the same monitoring strategy.
For the complete list of storage and mounted disk entities exposed by the integration, see Reference.
For physical drive temperatures and health information, see Hardware.
↑ Back to topTroubleshooting
Most PVE monitoring problems can be narrowed down by identifying where the information stops being available: the connection to Proxmox, authentication and permissions, the Proxmox API, or the additional hardware information provided by the host.
Start with the simplest checks before changing the integration configuration.
The integration cannot connect to PVE
If the initial connection fails, verify the basic connection information first:
- confirm that the PVE host address is correct;
- confirm that Home Assistant can reach the Proxmox server over the network;
- verify the configured Proxmox user;
- verify the Token ID and Token Secret when API Token authentication is used;
- check whether SSL certificate verification matches your environment.
Remember that User, Token ID and Token Secret are separate values in the configuration flow.
If you recently recreated an API Token, make sure Home Assistant is using the new secret.
Authentication works, but some information is missing
A successful login does not necessarily mean that the account can access every endpoint used by the integration.
If the PVE connection succeeds but particular information or functionality is unavailable, check the permissions assigned to the dedicated Home Assistant user and API Token.
Pay particular attention to Privilege Separation when API Token authentication is used.
A token can authenticate correctly while still lacking permission to access some Proxmox information or perform supported actions.
A VM or CT does not appear
Proxmox Extended Sensors only needs to expose the guests that you have chosen to monitor.
If a VM or container is missing, first confirm that it is included in the integration configuration.
Also verify that the guest still exists in Proxmox and that the configured account can access its information.
In a cluster, a guest may move between nodes. V5 is designed to follow monitored guests across nodes within the configured cluster, so a normal migration should not require the Home Assistant configuration to be recreated.
A sensor is unavailable or has no value
An unavailable entity does not always mean that the integration itself has failed.
The underlying information may temporarily be unavailable from Proxmox, the node may be unreachable, the guest may be stopped, or the corresponding information may not be provided in the current state.
Check related entities before diagnosing an individual sensor in isolation.
For example, if several entities belonging to the same node become unavailable simultaneously, check the node connection before investigating each sensor separately.
Hardware sensors are missing
Hardware monitoring depends on what the PVE host can detect.
If CPU, chipset, NVMe, SMART, DIMM or other hardware information is missing, first verify that the information is actually available on the Proxmox host.
Different machines can expose very different sets of hardware sensors.
The absence of a particular sensor is therefore not automatically an integration error.
Storage controllers, drivers, passthrough configurations and hardware support can also affect what information is available.
Storage information looks incomplete
Remember that PVE Storage, Mounted Disks and physical drive monitoring represent different views of storage.
A storage resource configured in Proxmox does not necessarily correspond directly to a physical disk detected by hardware monitoring.
Likewise, a mounted disk may be available to the host without being represented as the same type of PVE storage resource.
Check which type of information you expect before assuming that a storage entity is missing.
Controls do not work
If monitoring works but an action such as starting, stopping, shutting down or rebooting a guest fails, check the permissions assigned to the Proxmox account and API Token.
Read access can be sufficient for monitoring while control operations require additional privileges.
Also verify that the requested action is valid for the current state of the VM or container.
Check Home Assistant logs
When the cause is not obvious, Home Assistant logs can provide additional information about connection failures, permission errors or data that could not be retrieved.
Open:
Settings → System → Logs
Look for entries related to Proxmox Extended Sensors around the time the problem occurred.
When reporting a problem, include the relevant error information but remove credentials, API Token secrets and any other sensitive information before sharing logs publicly.
Before opening an issue
Before reporting a problem, try to determine whether it affects:
- the complete PVE connection;
- one particular node;
- a VM or container;
- storage information;
- hardware monitoring;
- or a specific control or entity.
A focused description makes troubleshooting much easier.
Include the relevant Proxmox Extended Sensors version, Home Assistant version and Proxmox VE version together with the error or unexpected behaviour.
Never include passwords or API Token secrets.
If the problem persists after these checks, use the project's GitHub issue tracker to report it.
↑ Back to top